Authentication
An EngFlow cluster authenticates three things:
- Itself, via a TLS certificate, so clients can verify they are talking to the real cluster.
- gRPC API clients, like Bazel, Buck, cmake-re, and other CLI tools.
- HTTP clients like browsers (for the cluster UI) and other HTTP API consumers.
You must configure all three for a new cluster to be usable:
- You must either provide a server TLS certificate and key
or configure the cluster as
--insecure; otherwise the service will fail to start. We don't recommend the insecure mode for production deployments, even if the service is behind a TLS-terminating load balancer. - gRPC and HTTP both default to denying every request, so you have to pick and configure authentication mechanisms for each. See gRPC: Authenticating Bazel and CLI clients and HTTP: Authenticating browsers and HTTP API consumers respectively.
Updating an existing cluster
Authentication changes can lock out users mid-build, so changes may require careful planning and migration. HTTP allows multiple authentication mechanisms at the same time, which lets you migrate clients in stages. gRPC also allows multiple authentication mechanisms at the same time, but requires more care to configure.
Managing credentials in an existing cluster: EngFlow clusters can issue mTLS certificates and JWT bearer tokens; see Credential lifecycle.
Server TLS certificate
To use TLS, you must configure the --tls_certificate
flag to reference the full certificate chain and the --tls_key
flag for the unencrypted key, both in PEM format. You can provide these values either
as files or using the AWS or GCP secrets manager. Note that there is no built-in
support to request or renew the certificates, and certificate or key changes
require a service restart.
For HTTP Strict Transport Security (HSTS), TLS version, and cipher suite configuration see the options documentation. We also support client TLS (mTLS) via a separate set of flags, see below.
For Bazel users: by default, Bazel trusts the set of root certificates that
is shipped with its embedded JDK. If your cluster's TLS certificate is signed
by a CA that is not included, configure Bazel to trust it via its
--tls_certificate
flag. It has the same name as the EngFlow service flag, but configures the
CA that Bazel trusts to sign server certificates.
gRPC: Authenticating Bazel and CLI clients
The recommended setup is to accept mTLS certificates, JWT bearer tokens, and optionally configure federated OIDC bearer tokens. By controlling the creation of mTLS certificates and JWT bearer tokens, you can steer clients in one or the other direction:
- If you have a TLS client CA, you can issue mTLS certificates directly; alternatively, the cluster can issue them via its web UI (after the user authenticates in the browser, see below).
- The cluster can issue JWT bearer tokens via its web UI, or via the Credential helper (both browser-authenticated).
- OIDC bearer tokens are issued by your IdP and can be directly used with the cluster's gRPC APIs, or converted into cluster-issued JWT tokens.
To enable mTLS, JWT, and OIDC together:
Authorization is determined in one of four ways, depending on the mechanism:
- Roles inherited from HTTP: the roles are assigned at the time the user authenticates via HTTP, and embedded in the credential. Used by JWT.
- From
--principal_based_permissions: a principal is extracted at request time and looked up in the flag. Used by mTLS, None, and GitHub Tokens. - From
--oidc_role_mapping: token claims are matched against mappings at request time. Used by OIDC federation. - From an external system: authorization is delegated. Used by GCP RBE (Google IAM) and External (sidecar service).
mTLS
Usage: --client_auth=mtls
Mutual TLS (mTLS) authentication requires each client to present a signed
X.509 client TLS certificate whenever it establishes a connection to the
cluster. Use the
--tls_trusted_certificate flag to
configure the certificate authority that is trusted to authenticate clients.
If you are using Bazel, you can configure mTLS using the
--tls_client_certificate and --tls_client_key flags.
Authorization: The --principal_based_permissions
flag controls authorization. The service extracts the principal name from the
client certificate:
- If the client certificate has a Subject Alternative Name (SAN) of type email, then the email is used.
- Otherwise, the Common Name (CN) of the client certificate is used. The CN can be any string supported by X.509 certificates, such as plain usernames, email addresses, or FQDNs.
If the principal is an email address then you can use the *@example.com syntax
to mean everyone under that email domain. Otherwise you must use the exact
principal name, or * to mean "everyone".
JWT
The cluster can issue and verify its own JWT bearer tokens, in addition to
any --client_auth mechanism. Clients send the JWT in a request header,
and the cluster validates the signature against its own signing key. JWT
authentication is enabled by default, so a JWT issued by this cluster is
always accepted as a valid credential, regardless of
--client_auth.
Different Expirations
Manual-issued and credential-helper-issued JWTs have different defaults and use different expiration flags for historical reasons.
Authorization: The user's roles are determined at the time the JWT is issued
and embedded in the token. It comes from the engflow_roles custom claim if
your OIDC provider returns it; otherwise, from
--principal_based_permissions.
See OpenID Connect Login for more details.
Manual usage
The cluster web UI lets users generate a JWT bearer token directly if the
--experimental_jwt_auth flag is enabled.
After logging in, navigate to its Getting Started page and create a token. Use it
via Bazel's --remote_header flag:
Tokens issued this way use the expiration configured via
--mtls_expiration for historical reasons.
Credential helper
The EngFlow credential helper tool uses the OAuth2 device flow. The device
flow is enabled by default; see the
--oauth2_device_flow flag to disable it.
JWT expiration can be configured via the
--oauth2_device_flow_expiration
flag.
The credential helper is the easiest way for users to obtain a JWT: with the cluster UI enabled, log in via a web browser (not necessarily on the same machine) and the helper retrieves and refreshes the token.
For installation and client configuration instructions, see the engflow_auth documentation.
OIDC federation
OIDC federation can be enabled regardless of client_auth via the following
flags:
If multiple mappings apply, the first one is prioritized.
At a minimum, you should require the issuer and audience claims:
issthe issuer (this is required and returns an error if missing)audthe audience (typically the cluster URL)
Authorization: The --oidc_role_mapping flag maps verified tokens directly
to user roles, bypassing --principal_based_permissions.
None
Usage: --client_auth=none
Unauthenticated requests are given default permissions via
--principal_based_permissions=*->role rather than being rejected outright.
This typically means that anyone who can initiate a network connection to
the cluster can use it. We recommend using this mechanism only in combination with network-based
usage restrictions, e.g., over a VPN.
Note: clients with valid JWT or OIDC credentials still authenticate via those and get the associated permissions.
Deny
Usage: --client_auth=deny
Clients with valid JWT or OIDC credentials still authenticate via those and get the associated permissions. All other client requests are denied.
Use this to cut off gRPC access to a cluster without shutting it down. The
cluster can still serve HTTP requests with the right
--http_auth flag.
GCP RBE
Usage: --client_auth=gcp_rbe
Deprecated option
gcp_rbe provides compatibility to former users for Google's RBE service.
This option is not offered to new customers.
GCP RBE-based authentication also uses GCP OAuth 2.0 bearer tokens. However,
instead of relying on verified email addresses, it queries GCP's IAM for the
Google-defined Remote Build Executor permissions, and unlike other
--client_auth methods it therefore ignores
--principal_based_permissions.
In order to use this authentication mechanism, you must specify a GCP project
using the --gcp_rbe_auth_project flag.
If you are using Bazel, you can configure it using either
--google_default_credentials or --google_credentials.
Authorization: Unlike other --client_auth mechanisms, the
--principal_based_permissions flag is ignored with
--client_auth=gcp_rbe. You have to specify permissions in GCP IAM,
as described below.
The Google GCP permissions and roles are documented here: https://cloud.google.com/iam/docs/understanding-roles#other-roles
The mapping between GCP permissions and EngFlow permissions is incomplete: the EngFlow Remote Execution service supports only a subset of the RBE permissions and roles, and GCP defines only a subset of the permissions that EngFlow supports.
GCP RBE Permissions:
remotebuildexecution.actions.createto run an action remotelyremotebuildexecution.actions.deleteto delete an action cache entry (this is not used by Bazel)remotebuildexecution.actions.getto read an action cache entryremotebuildexecution.actions.writeto write an action cache entry from a client (remotely executed actions always have write access to the action cache)remotebuildexecution.blobs.createto write an entry to the CASremotebuildexecution.blobs.getto read an entry from the CAS or query whether an entry is in the CAS based on its digest
These are the relevant roles, though note that you can create custom roles for different subsets of permissions:
-
Remote Build Execution Artifact Creator aka
roles/remotebuildexecution.artifactCreatorCan run actions remotely. This is the most commonly used role, and maps to the
userrole defined in EngFlow RE. -
Remote Build Execution Artifact Admin aka
roles/remotebuildexecution.artifactAdminCan run actions remotely, and also delete actions. Cannot write actions to the cache.
-
Remote Build Execution Action Cache Writer aka
roles/remotebuildexecution.actionCacheWriterCan write CAS and action cache entries. This is primarily useful when using the system as a pure cache without remote execution. In this use case, the CI system should be allowed to read and write the cache (requires both this role and the Remote Build Execution Artifact Viewer), while individual engineers are only allowed to read the cache.
-
Remote Build Execution Artifact Viewer aka
roles/remotebuildexecution.artifactViewerCan read CAS and action cache entries. This is primarily useful when using the system as a pure cache without remote execution.
Build Event Streams with --client_auth=gcp_rbe
As of 2021-09-29, GCP IAM has no permissions to control Build Event Stream
uploads that we could map to EngFlow Remote Execution permissions. When using
--client_auth=gcp_rbe, the cluster allows Build Event Stream uploads if the
remotebuildexecution.blobs.create permission is present.
External
Usage: --client_auth=external
Deprecated option
external authentication is no longer supported for new customers.
Since v1.53 you can use an external service to authenticate and authorize gRPC client requests.
This must be a service running on localhost next to the scheduler, communicating over gRPC. Please contact us for details.
Authorization: Unlike other --client_auth mechanisms, the
--principal_based_permissions flag is ignored with
--client_auth=external. The external service is responsible for authorization
too.
GitHub Tokens
Usage: --client_auth=github_token --experimental_github_auth_container=foo/hello-world:1.0
Deprecated option
GitHub token authentication is deprecated. We recommend mTLS, credential helper, or OIDC instead.
Note that --client_auth=github_token accepts both GitHub tokens and mTLS
client certificates, making it a superset of --client_auth=mtls.
You can use GitHub-signed tokens as credentials. The token can be a
GITHUB_TOKEN (available to GitHub Actions runners) or a Personal Access Token.
More info: https://docs.github.com/en/actions/security-guides/automatic-token-authentication
Assuming the token is stored in an envvar ($GITHUB_TOKEN), run Bazel with
--remote_header=Authorization=Bearer $GITHUB_TOKEN.
Example (.github/workflows/engflow.yml GitHub Actions snippet):
| YAML | |
|---|---|
GitHub Actions
GitHub Actions will automatically mask the $GITHUB_TOKEN value in the logs.
GitHub Actions Permissions: Your workflows must have at least read access to GitHub packages, like so:
In addition to YAML permissions, you must ensure the container is linked to your repository.
Navigate to the Package Settings -> Manage Actions access and add the repository with 'Read'
access.
Container: You need an existing private container on ghcr.io that is used as a proxy to
check if the GITHUB_TOKEN is valid. Use --experimental_github_auth_container to specify the
namespaced path of the container, e.g., org-name/image-name:tag. Only GitHub Action runners
of the organization with a valid GITHUB_TOKEN should have access to this container. The
container can be anything; it won't be pulled or run, only have its existence checked.
Example: for the foo GitHub organization with a private container hello-world:1.0:
Authorization: Clients authenticated via a GitHub token are all mapped to
the github_token principal. Clients authenticated via mTLS use the same flag
with their certificate-derived principal, as described in mTLS. For
example, to allow user permissions, add
--principal_based_permissions+=github_token->user.
HTTP: Authenticating browsers and HTTP API consumers
The recommended setup for HTTP is Single Sign-On (SSO) via OIDC or SAML using your existing IdP, optionally with System for Cross-domain Identity Management (SCIM) integration. If you have a TLS client CA, you can also enable mTLS authentication.
The --http_auth flag accepts multiple values, so you
can run several login methods in parallel and migrate users between them; as an
exception, if one of the values is deny, no other values may be set. Adding
none with other login methods enables anonymous read access to the UI; see
below for details.
All HTTP auth mechanisms except none, deny, and mtls issue a session
cookie containing a JWT upon login. Further requests are authenticated via the
cookie. You can set the cookie expiration using
--experimental_web_login_expiration.
For authorization, the cluster uses either the roles determined at login and
stored in the session cookie (OIDC, SAML, Basic), or extracts the principal and
looks up the role in
--principal_based_permissions
(mTLS). As an exception, none always grants read-only permissions for
unauthenticated requests.
Note that a user may log in even if their principal is not granted any permissions. In that case, the cluster will deny their subsequent HTTP requests. This means it is safe to use a less restrictive authentication mechanism (e.g. a common Google or Okta setup), and control access via permissions.
None
Usage: --http_auth=none
Unauthenticated requests are given viewer permissions to the UI rather than being rejected outright. This typically means that anyone who can initiate a network connection to the cluster can use it.
Use this only if you want to make the UI public, e.g., for open source projects. We don't recommend this for internal setups, even if cluster access is guarded by network controls such as a VPN. Gating using network controls makes it difficult for users to login as they will be silently treated as anonymous viewers instead of being prompted to authenticate, even if another login method is available. It also disables audit logging for unauthenticated HTTP requests.
Authorization: All unauthenticated requests get the built-in viewer role;
this is not configurable via --principal_based_permissions.
Deny
Usage: --http_auth=deny
Denies all HTTP requests; cannot be combined with other authentication methods.
This is useful when you want to cut off HTTP access to a cluster without
shutting it down. The cluster still serves gRPC requests to authenticated
or even unauthenticated clients according to its --client_auth setting.
OpenID Connect Login
Usage: --http_auth=oidc_login
Authenticates clients through OpenID Connect (OIDC). You need to create an
OAuth 2.0 Client ID with your identity provider (IdP) and set the
--oidc_config flag to either a local file path or
an AWS or GCP secrets manager reference.
Authorization: The user's roles are determined at login. If your IdP returns
the engflow_roles claim, the cluster uses those roles; otherwise it consults
--principal_based_permissions
using the email address as the principal.
See Roles, Policies, and Permissions for details on engflow_roles.
Setup: EngFlow supports using OIDC's Implicit Flow, Authorization Code flow and Hybrid Flow.
- Implicit flow: Upon authentication, the IdP directly returns an ID token.
- Authorization flow: The IdP returns an authorization code. An ID token can be requested from the IdP using the authorization code and a client secret.
- Hybrid flow: Combines both models. Tokens may be returned directly or an authorization code is sent.
Your identity provider may support multiple flows. In this case, choose the flow according to your organization's policy. EngFlow only requests very basic information about the account:
- scope
openidto enable OIDC login, - scope
emailto identify the user, - optionally scope
profile. Ifprofile[picture]is supported by the IdP, signed-in users will see their public profile picture, instead of a default profile icon.
Setup: Authorization Code flow
-
Create an OAuth 2.0 Client ID configured for the authorization code flow.
- supported scopes: include
openid,email, and optionallyprofile - sign-out redirect URIs: include your cluster's HTTP endpoint, e.g.
https://YOUR-CLUSTER.engflow.com/
- sign-in redirect URIs: include the path
/oidc-redirect(or a wildcard*) for your cluster's HTTP endpoint, e.g.https://YOUR-CLUSTER.engflow.com/oidc-redirecthttps://YOUR-CLUSTER.engflow.com/*
- supported scopes: include
-
Note down the
client_idandclient_secret. -
Locate your IdP's Issuer discovery URI, below referenced as
discovery_uri.- Google:
https://accounts.google.com/.well-known/openid-configuration. - Okta: Commonly
https://{yourOktaDomain}/.well-known/openid-configuration. If you have set up a custom Authorization Server, the URI is listed as the Metadata URI in the details of the Authorization Server, found under Security > API. Then the URI usually has the formhttps://{yourOktaDomain}/oauth2/{authorizationServerName}/.well-known/oauth-authorization-server. - Keycloak: the URI is listed under Endpoints in the Realm Settings
> General . Depending on the version of Keycloak you are using, the
URI may take on one of the following forms:
http://{keycloakhost:keycloakport}/auth/realms/{realm}/.well-known/openid-configurationhttp://{keycloakhost:keycloakport}/realms/{realm}/.well-known/openid-configuration
Without Issuer discovery
If your IdP does not support Issuer discovery, instead locate the following endpoints:
The token endpoint is only required for the authorization code flow, not the implicit flow.authorization_endpoint,token_endpointandjwks_uri. Then create a JSON file with the following contents, rather than those included in the next step: - Google:
-
Create a JSON file with the following contents:
-
Update the EngFlow config.
Example:
As the config for the authorization flow includes the
client_secret, the JSON file should be stored in a secrets manager. The value for--oidc_configthen does not specify an absolute path to the file, but is prepended bysecretstore://, followed by the secret's location, e.g.
Setup: Implicit flow
The setup is similar to that for the Authorization code flow, with the following differences to the JSON file:
- Omit the entry for the
client_secret. - When not using Issuer discovery, the
token_endpointcan also be omitted.
Setup: Implicit flow in Okta
The below gives a more detailed example for setting up the implicit flow in Okta. For other IdPs, follow a similar process.
-
Create an OAuth 2.0 Client ID in Okta using the App Integration Wizard (AIW).
In the Applications section, create an app integration.
For Sign-in method, select OIDC - OpenID Connect.
For Application Type, select Web Application.
For Grant type, select Implicit (hybrid).
For Sign-in redirect URIs, add
https://YOUR-CLUSTER.engflow.com/oidc-redirect, adjusting the base URL to the cluster's HTTP endpoint.For Sign-out redirect URIs, add the base URL of the cluster's HTTP endpoint, e.g.
https://YOUR-CLUSTER.engflow.com/.For Assignments choose the appropriate setting for your use case.
Upon saving, ensure the Grant type setting has Allow ID Token with implicit grant type enabled. Allow Access Token with implicit grant type is not required.
In the Okta API Scopes of your application grant the scope okta.users.read.self.
Once you are done, note down the Client ID. You do not need the Client secret.
Visit Okta's Help Center for more information on how to create an OIDC app integration.
-
Determine the discovery URI.
By default, the discovery endpoint should be available at the URI
https://{yourOktaDomain}/.well-known/openid-configuration.Verify this URI loads a JSON file with entries
authorization_endpoint,jwks_urietc. The entryscopes_supportedshould at least includeopenidandemail.If you want to set up a custom Authorization Server, do so in the Security section, subsection API. Ensure the server includes the scopes
openidandemail. Once done, note down the Metadata URI as the discovery URI. It usually has the formhttps://{yourOktaDomain}/oauth2/{authorizationServerName}/.well-known/oauth-authorization-server. Verify this URI loads the expected JSON file as described above. -
Create a JSON file with the following contents:
-
Update the EngFlow config.
Example:
Issuer-specific login buttons
If the --oidc_config does not include an entry for "issuer", the login page
shows a generic OIDC login button.
The following issuer-specific buttons are supported: GOOGLE, KEYCLOAK,
OKTA.
Example:
| JSON | |
|---|---|
Using multiple Identity Providers
EngFlow supports specifying multiple OIDC configurations. The UI login page then shows one login button for each IdP configured. Especially in this case, use issuer-specific login buttons, so users can differentiate the buttons. Reach out to us if you want a custom button for a not-yet listed IdP.
Example configuration:
SAML Login
Usage: --http_auth=saml_login
Authenticates clients through SAML. You need to create a
SAML 2.0 app with your identity provider (IdP) and set the
--saml_config flag to either a local file path or
an AWS or GCP secrets manager reference.
Authorization: The --principal_based_permissions
flag controls permissions. With --http_auth=saml_login, the principal name is the
email address of the client.
SAML attribute-based roles are not currently supported; all roles come from
--principal_based_permissions.
Setup
- Create a SAML 2.0 app with your identity provider (IdP).
-
Save the metadata XML into a config file. It should have roughly the following contents, note the placeholders
xxx: -
Update the EngFlow config.
Example:
Setup on Google
-
On
admin.google.com, underApps, thenWeb and Mobile Apps, add a new app of the typecustom SAML app. Details on support.google.com -
Save the IDP metadata into a config file.
Setup on Okta
-
On your Okta admin page, under
Applications, create anApp Integrationof typeSAML 2.0. -
Visit the
Metadata URLand copy the content displayed into a config file.
mTLS
Usage: --http_auth=mtls
Authenticates clients via TLS client certificates, the same way
--client_auth=mtls does for gRPC. Use the
--tls_trusted_certificate flag to
configure the certificate authority that is trusted to authenticate clients.
mTLS for HTTP composes with other login methods, so users can present a client
certificate or fall back to a web login flow.
Authorization: The cluster extracts the principal from the client
certificate at request time and looks it up in
--principal_based_permissions.
The principal extraction follows the same rules as
gRPC mTLS: if the certificate has a subject alternative name (SAN)
of type email, the email is used; otherwise the Common Name (CN) is used.
Basic
Usage: --http_auth=basic
Authenticates users via a username / password login web page. You have to
create an htpasswd file in APR1 format (Apache MD5 - see
https://httpd.apache.org/docs/2.4/misc/password_encryptions.html) with the
user-password pairs and pass it via the
--basic_auth_htpasswd flag. Note that the
file is only read on service startup. Example:
Authorization: The --principal_based_permissions
flag controls permissions. The principal name is the
username in the htpasswd file.
Generate the htpasswd file using (-cm to create the file once, then -m to
add more):
The generated entry will look like:
System for Cross-domain Identity Management (SCIM): User provisioning
EngFlow supports SCIM 2.0 so your identity provider (IdP) can provision,
update, and deprovision EngFlow users and their roles. EngFlow implements the
core user schema (urn:ietf:params:scim:schemas:core:2.0:User) and the
enterprise user schema
(urn:ietf:params:scim:schemas:extension:enterprise:2.0:User). EngFlow currently supports the following SCIM sources:
- Okta
- Microsoft Entra ID
Contact EngFlow to enable SCIM on your cluster.
EngFlow supports the RFC-defined schemas and attribute mappings. Additional attribute mappings and non-core schema types are not supported.
SCIM provisioning is separate from authentication: it controls which users are enabled and what they are authorized to do, regardless of how they sign in. When you enable SCIM enforcement, SCIM governs access to every authentication method, not only the ones your IdP provides.
Supported resources and features
When your IdP asks which SCIM resources and features EngFlow supports, use the following:
| Resource / Feature | Status |
|---|---|
| Users | Supported |
| Users > Roles | Supported |
| Groups | Supported |
| Patch updates | Supported |
| Batch updates | Not supported |
Connecting your identity provider
Once EngFlow enables SCIM on your cluster, the cluster exposes a SCIM endpoint at
/api/scim/v2/. Provide the following details in your IdP's SCIM integration:
- SCIM base URL:
https://<cluster_URL>/api/scim/v2/ - Authentication method: OAuth bearer token
- Bearer token: the token EngFlow provides
Enforcement and deprovisioning
When SCIM enforcement is enabled, only a user that has been provisioned and is active via SCIM is authorized to access the cluster. Additionally, authorized users are only assigned roles provisioned by the SCIM provider.
When you deactivate or remove a user in your IdP, EngFlow revokes all of that user's credentials and signs them out of the UI.
Note
SCIM updates can take up to five minutes to propagate across the cluster.
Role resolution
Your IdP assigns roles to users and pushes them to EngFlow through the SCIM
roles attribute on each User record. Each role value must match a valid
EngFlow role; EngFlow silently drops unrecognized roles. See
Roles, Policies, and Permissions for the available roles.
How SCIM roles combine with roles from other identity sources depends on your cluster's enforcement configuration. Contact EngFlow to start the SCIM configuration process and choose the behavior that fits your setup.
Provisioning roles from your identity provider
The following walkthroughs show how to send EngFlow roles through the SCIM
roles attribute from Microsoft Entra ID and Okta. They use default profile
configurations and attribute mappings; a production configuration may use groups
and more complex mappings that you manage in your IdP.
Microsoft Entra ID
Reference: Provisioning a role to a SCIM app.
Note
If you have the Azure "Global Administrator" role, it does not necessarily include the "Cloud Application Administrator" role, which you may need to perform these tasks.
You can send multiple user roles, including roles assigned through group membership, so you can manage EngFlow role assignment entirely through Entra ID app role assignments. Alternatively, EngFlow can map SCIM groups to EngFlow roles within the cluster configuration, without sending roles from your IdP; contact EngFlow to set this up.
You define app roles on the App Registration, not the Enterprise
Application. Each app role corresponds to an EngFlow role name that EngFlow
receives in the roles attribute. To define app roles:
- In the Azure portal, go to Microsoft Entra ID > App registrations and open the registration for your EngFlow SCIM app.
- Select App roles > Create app role.
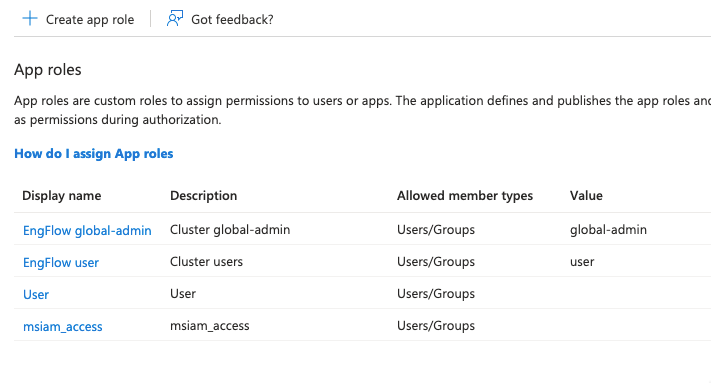
- Fill in the following fields for each EngFlow role you want to provision:
- Display name: a human-readable label (for example,
EngFlow Global Admin) - Allowed member types: Users/Groups
- Value: the exact EngFlow role name as specified in the List of built-in roles or custom roles that have been created on the cluster. For example,
global-admin. This is what EngFlow receives in the SCIMroles[].valuefield - Description: any description
- Do you want to enable this app role?: checked
- Display name: a human-readable label (for example,
- Click Apply. Repeat for each EngFlow role you wish to assign from Entra ID.
Once defined, you can assign app roles to users or groups from the Enterprise Application's Users and groups tab.
Entra ID requires you to declare the roles attribute as multi-value before
you can map it. To add the attribute to the app attribute list:
- Navigate to the Enterprise Application's Provisioning > Attribute Mappings.
- Select Show advanced options, then Edit attribute list for
customappsso(or the equivalent link for your app type). - Add a new attribute with the following settings:
- Name:
roles - Type:
String - Multi-value: checked
- Name:
- Save.


To add the roles attribute mapping:
- Back in Attribute Mappings, click Add New Mapping.
- Set the following fields:
- Mapping type: Expression
- Expression:
AssertiveAppRoleAssignmentsComplex([appRoleAssignments]) - Target attribute:
roles
- Save.
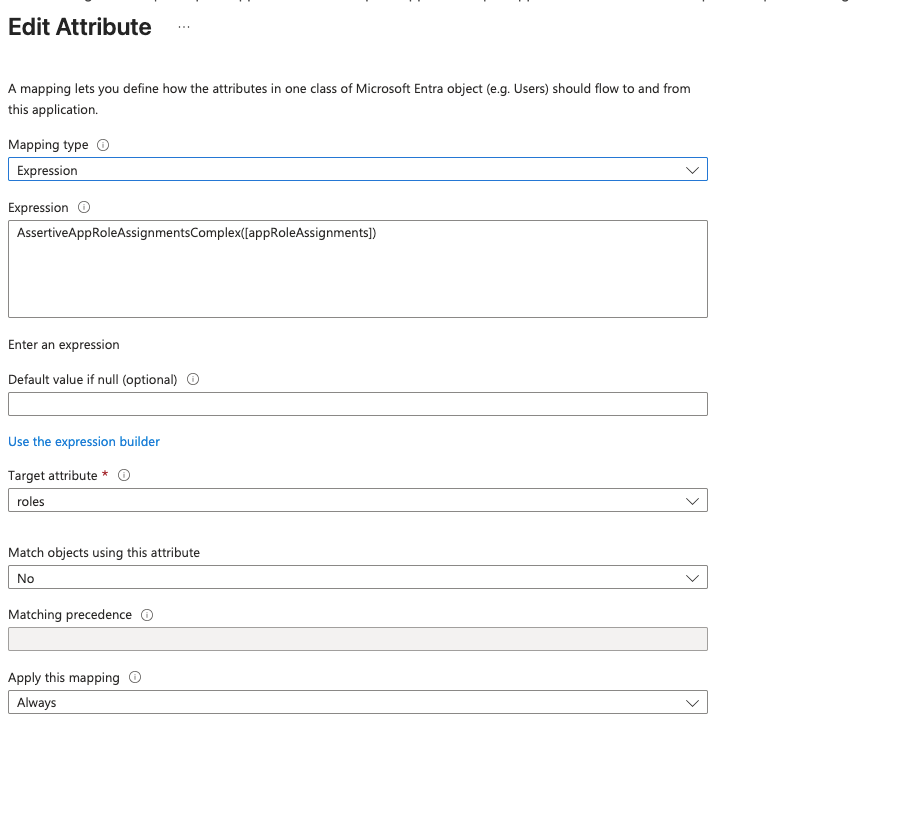
Use the AssertiveAppRoleAssignmentsComplex expression: it issues PATCH replace
operations, keeping the user's roles in EngFlow exactly in sync with their Entra
ID app role assignments. Avoid the alternatives SingleAppRoleAssignment (single
role only) and AppRoleAssignmentsComplex (add-only, does not remove roles).
Warning
Do not map appRoleAssignment directly to the roles attribute. It must
go through the expression above to be transformed into the correct SCIM
format.
Assigning roles through groups
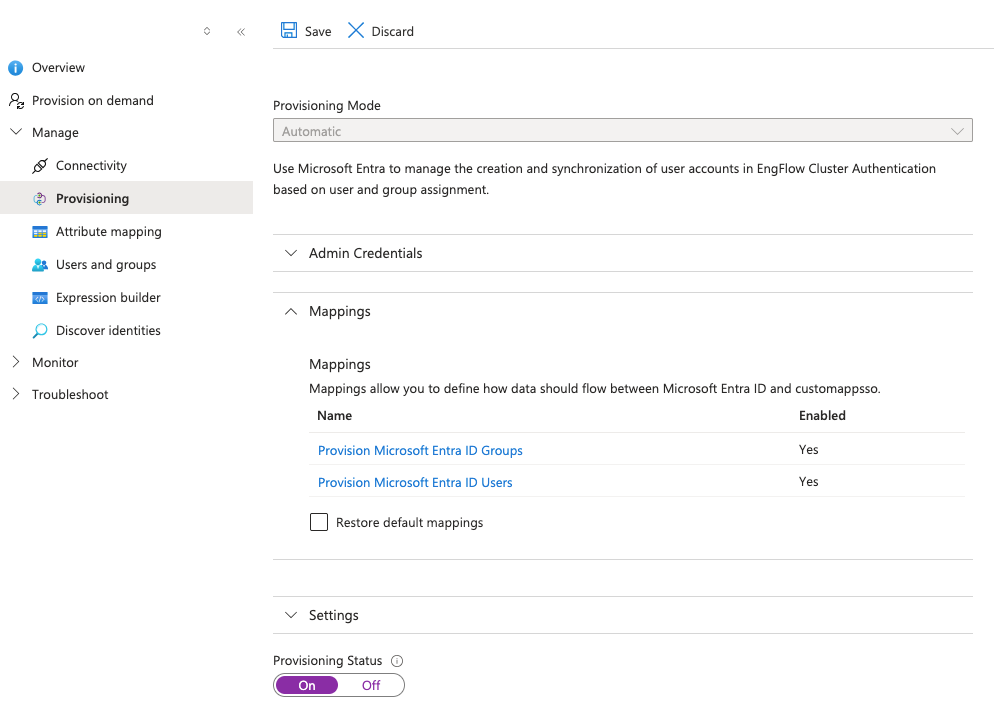
You can assign EngFlow roles to an Entra ID group instead of individual users. Entra ID attaches the group's app roles to each member's user record when it provisions that user, but only if group provisioning is enabled.
-
In the Enterprise Application's Provisioning > Mappings, confirm that Provision Microsoft Entra ID Groups is enabled. EngFlow supports only the default group mappings.
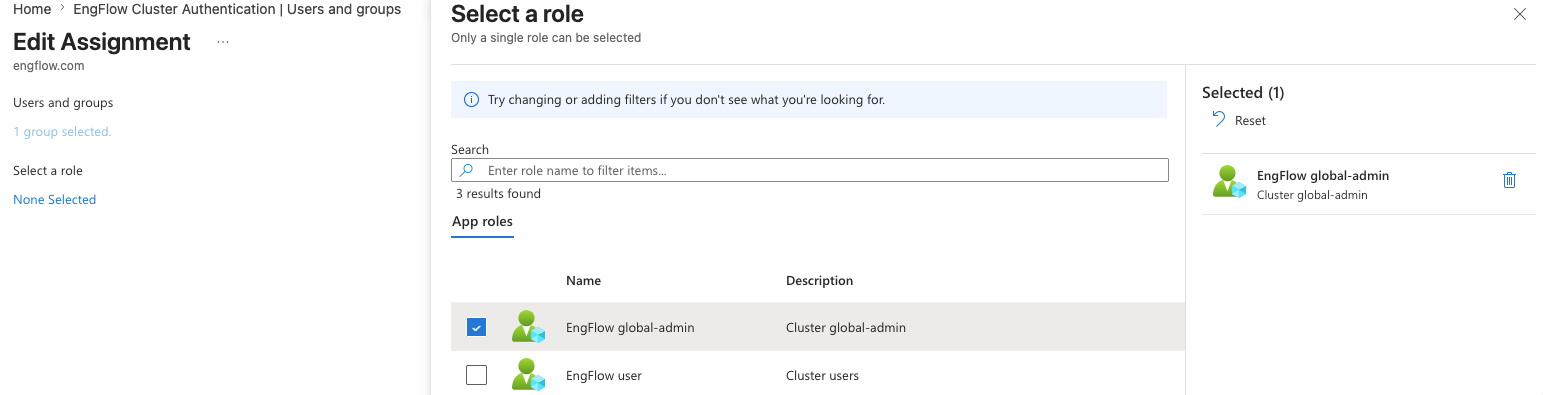
-
In the Enterprise Application's Users and groups tab, assign the group and select the app roles that correspond to the EngFlow roles you want its members to receive.
Okta
Reference: How to add multivalue roles in SCIM Cloud integration.
Okta requires a top-level roles array attribute in the SCIM app profile before
you can map per-role attributes. In the app's Profile Editor:
- Add the top-level
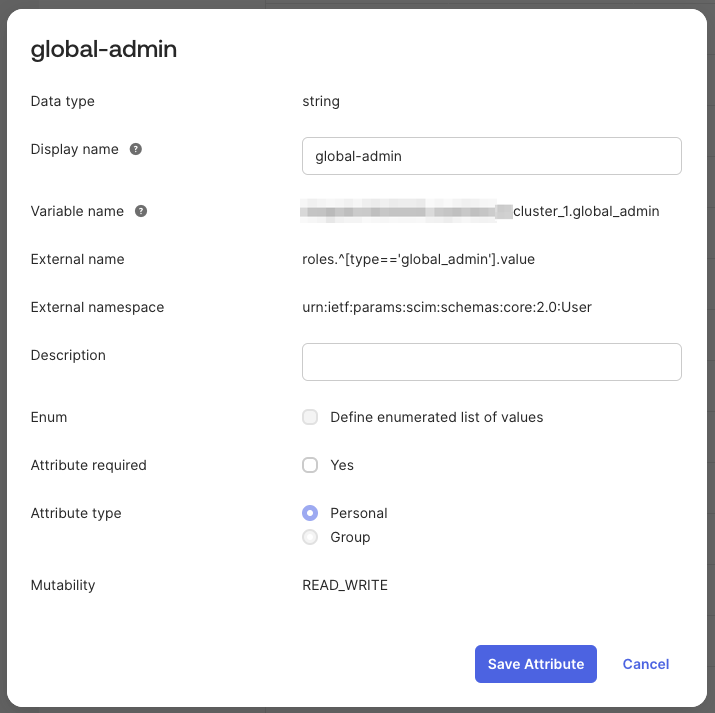
rolesattribute with the following settings:- Data type:
string array - External name:
roles - External namespace:
urn:ietf:params:scim:schemas:core:2.0:User
- Data type:
- Add a per-role attribute whose external name targets the matching role object:
- Data type:
string - External name:
roles.^[type=='global_admin'].value- The
-character is not valid in the JSONPath filter expression. Replace any-characters in the role name with_in thetypefilter (for example,global_admin). The value pushed to EngFlow still uses the original-form, which you set in the user assignment.
- The
- External namespace:
urn:ietf:params:scim:schemas:core:2.0:User
- Data type:
- Repeat the previous step for each additional EngFlow role.
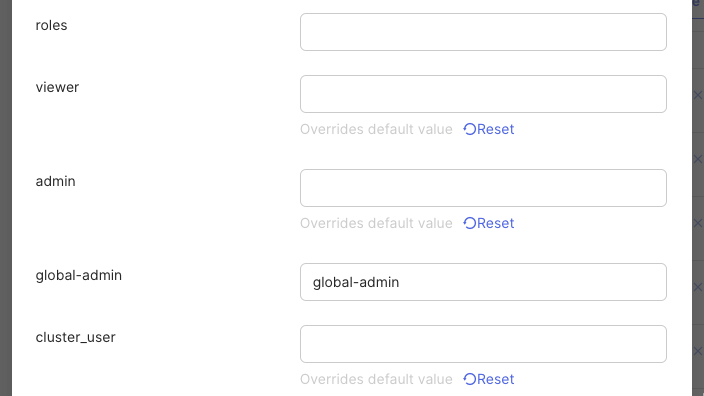
Assign a role to a user by setting the value to the literal role name as defined
in EngFlow. For example, Okta pushes
"roles": [{"type": "global_admin", "value": "global-admin"}] to EngFlow for
users assigned global-admin as the value for the Global Admin attribute. Note
that roles is not assigned a value.
Note
To automate or derive role assignments in Okta, see the Okta documentation or talk to your Okta administrator.
Assigning roles through groups
Unlike Entra ID, Okta does not provision group-assigned roles onto user records,
so you cannot send a group's roles through the SCIM roles attribute. The only
supported way to map an Okta group to an EngFlow role is within the cluster
configuration. Contact EngFlow to set this up.
Credential lifecycle
EngFlow clusters can issue mTLS certificates and JWT bearer tokens to users. This section covers their lifecycle: how the cluster records issued credentials, how to revoke them individually, and how to rotate the signing key without invalidating existing credentials.
External credentials (OIDC, SAML, GitHub tokens) are managed by the issuing identity provider.
User credential management
The cluster records all cluster-issued credentials if the
--experimental_record_generated_credentials
flag is enabled. When enabled, the cluster exposes a credential management UI
on the Admin Settings page for admin-level users.
EngFlow support can help revoke credentials that were issued before recording was enabled if you know their serial numbers. Contact support if you need to revoke such credentials.
It can take up to 5 minutes for a credential revocation to fully propagate across the cluster. This revocation delay only affects future requests, not in-flight requests that are already past the credential validity check.
In addition, SCIM deprovisioning automatically revokes all credentials pertaining to the deprovisioned user.
Cluster signing key rotation
You can rotate the cluster signing key for cluster-issued mTLS certificates and
JWT bearer tokens by generating a new key and updating the relevant flags (this
does not affect the server TLS certificate, which is
rotated independently via --tls_certificate/--tls_key):
| Text Only | |
|---|---|
Old keys should be removed once all credentials signed with them have expired.
We recommend rotating the cluster signing key annually unless you suspect that it has been compromised.